
Smart Home – TP-Link Tapo Camera (AWS Managed Integration)

What is this Integration?

TP-Link Tapo is a popular line of smart home cameras. This integration lets /IOTCONNECT™ connect to your Tapo cameras through AWS IoT Managed Integrations — Amazon’s service for controlling smart-home devices from different brands in a standard way — so you can watch their live feed from the same portal you use for the rest of your IoT devices.

Unlike a smart bulb (which you switch on, dim, or recolor), a camera’s main job is a live video stream. With this integration you can:

Start a live stream from a camera and watch it in the portal.

Stop the live stream when you are done.

The video is delivered in real time using WebRTC, the same low-latency technology used by video-call apps, so what you see is as close to live as possible.
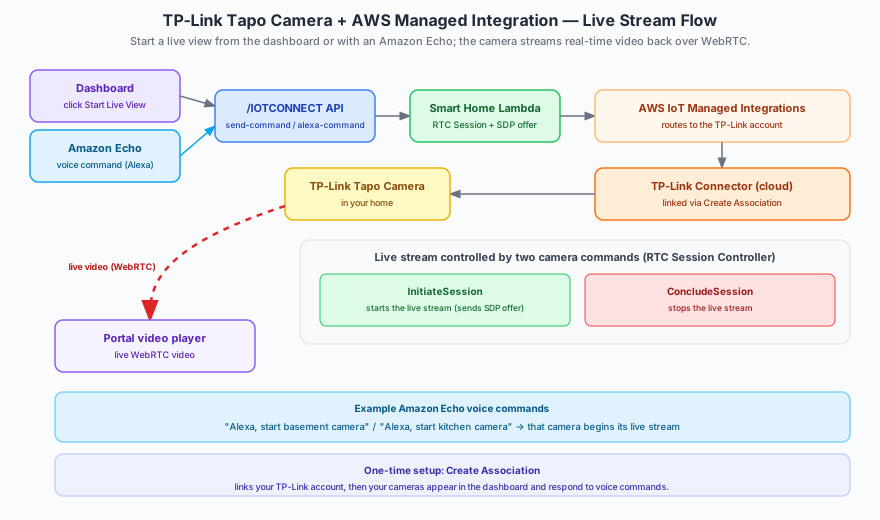
How It Works

TP-Link Tapo Camera AWS Managed Integration Flow

When you start a live view, /IOTCONNECT™ sets up a real-time video session with your camera and then plays the stream in the portal:

1. Dashboard or Echo: You click “Start Live View” in the portal, or say a command to your Amazon Echo.

2. /IOTCONNECT™ platform: The portal sends an Initiate Session request, including the details needed to open a WebRTC video connection.

3. Smart Home service: /IOTCONNECT™ builds a standard RTC session command.

4. AWS IoT Managed Integrations: AWS routes the request to your linked TP-Link account (your connector).

5. TP-Link Tapo camera: The camera accepts the session and begins streaming.

6. Live video plays: The video streams back over WebRTC and appears in the portal’s video player. When you’re done, a Conclude Session request stops the stream.

One-Time Setup: Connect Your Account

Before you can view any camera, you link your TP-Link account to /IOTCONNECT™ once. This is called creating an association.

Step 1 — Open Managed Integration in the portal and choose the TP-Link connector.

Step 2 — Create Association to securely link your TP-Link account through AWS.

Step 3 — Discover devices. After linking, the platform finds the cameras on your account and activates them.

Step 4 — See your cameras appear in the dashboard device list, ready to stream.

You only do this once per account. After that, your cameras stay available in the dashboard.

Viewing a Live Stream from the Dashboard

Once your cameras appear in the dashboard, starting a live view is simple. Open the device list and pick the camera you want.

Start the live view

Click Start Live View on the camera.

/IOTCONNECT™ sends an Initiate Session command, opens a WebRTC connection, and the live video appears in the portal’s player within moments.

Stop the live view

Click Stop.

The portal sends a Conclude Session command and the stream closes.

Each start and stop is recorded in Command History, where you can confirm whether it was Executed or Failed.

Voice Control with Amazon Echo

Just like the smart bulbs, your Tapo cameras also respond to Amazon Echo voice commands through Alexa. Instead of opening the dashboard, you can simply ask.

Examples:

“Alexa, start basement camera” — the basement camera begins its live stream.

“Alexa, start kitchen camera” — the kitchen camera begins its live stream.

How it works: When you speak to your Echo, Alexa sends the request to /IOTCONNECT™. The platform matches the spoken room name (such as “basement” or “kitchen”) to the right camera, then starts the same live-stream session the dashboard uses. The result is logged in Command History just like a dashboard command — so whether you click or speak, the camera reacts the same way.

ⓘ NOTE

You must Create Association (link your TP-Link account) once before any cameras appear in the dashboard or respond to voice. A live view uses two commands — Initiate Session to start and Conclude Session to stop — delivered through AWS IoT Managed Integrations, with the video carried over WebRTC. Whether started from the dashboard or an Amazon Echo, each action is saved in Command History as Executed or Failed.