


Video Walkthrough
Watch the complete LoRaWAN device onboarding walkthrough:
LoRaWAN (Long Range Wide Area Network) is a low-power, long-range wireless protocol designed for IoT devices. /IOTCONNECT™ provides full LoRaWAN device lifecycle management including gateway provisioning, template configuration with Bytes Commands, device onboarding with public / private network support, and OTA firmware updates.
Watch the complete LoRaWAN device onboarding walkthrough:
LoRaWAN is a Media Access Control (MAC) layer protocol built on top of LoRa radio modulation. It provides long-range communication (up to 15km in rural areas, depending on environmental and network conditions) at very low power consumption, making it ideal for battery-operated sensors that transmit small data packets infrequently.
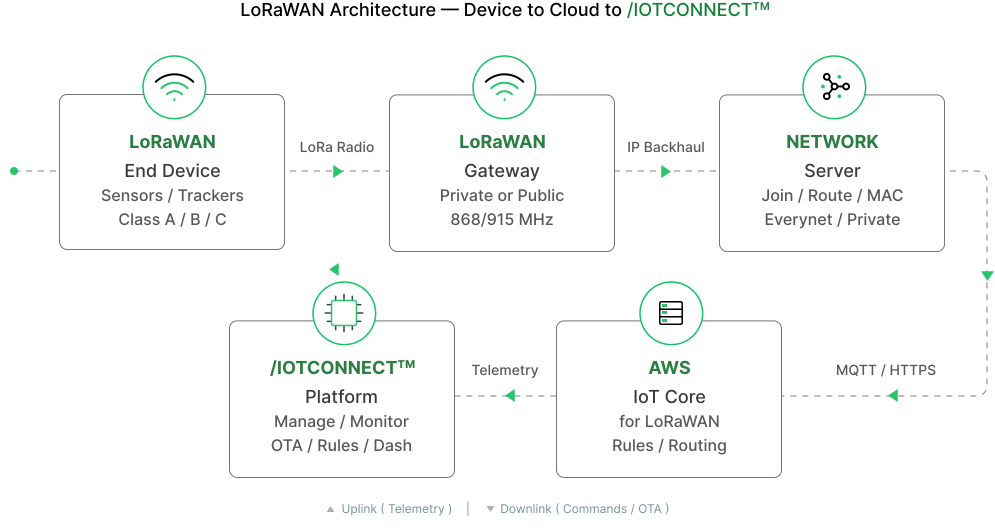
LoRaWAN operates in unlicensed sub-GHz frequency bands (EU868, US915, AS923, AU915, etc.) and supports three device classes:
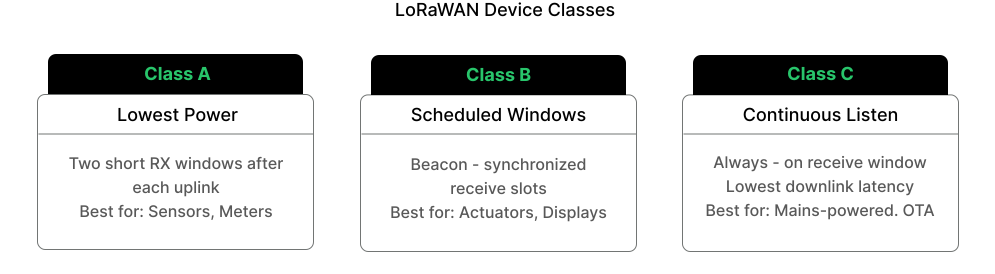
• Class A: Lowest power — devices open two short receive windows after each uplink transmission.
• Class B: Scheduled receive slots — devices open receive windows at scheduled times using beacons.
• Class C: Continuous listening — devices keep receive window open continuously (higher power, lowest latency).
/IOTCONNECT™ supports both public LoRaWAN networks (like Everynet) and private gateways for complete flexibility in deployment scenarios.
Before onboarding a LoRaWAN device to /IOTCONNECT™, ensure you have the following:
/IOTCONNECT™ Account: An active account with Wireless Device module access enabled.
LoRaWAN Hardware: A LoRaWAN-compatible end device (sensor, tracker, or actuator) with known DevEUI.
Network Choice: Decide between Public network (requires coverage in your area) or Private network (requires your own LoRaWAN gateway).
Gateway (Private only): If using a private network, a LoRaWAN gateway registered in /IOTCONNECT™ with EUI code and frequency band configured.
Network Coverage (Public only): If using a public network, verify Everynet coverage in your area using the coverage map link provided in the portal.
Device Credentials: DevEUI, AppKey (for OTAA) or DevAddr, NwkSKey, AppSKey (for ABP) from your device manufacturer.
Activation Method: Choose OTAA (recommended, supports roaming on public networks) or ABP (static keys, private network only).
If you are using a private network, you must first register your LoRaWAN gateway in /IOTCONNECT™. Skip this step if using a public network.
Navigate to Wireless Device → LoRaWAN Gateways tab and click Create Gateway. Fill in:
• Gateway Name: A human-readable name for your gateway.
• EUI Code: The unique 64-bit Extended Unique Identifier of your gateway (from the gateway hardware).
• Frequency Band: Select the frequency band matching your region (EU868, US915, AS923, AU915, etc.).
• Description: Optional notes about the gateway location or purpose.
Click Save. The gateway will appear in the LoRaWAN Gateways list and will be available as a dropdown option when creating devices with private network type.
Templates define the blueprint for your LoRaWAN device. Navigate to Wireless Device → Templates tab.
1. Click Create Template and set Transmission Type to LoRaWAN.
2. Enter template name and code.
3. Configure the template tabs:
• Properties: Define template metadata and settings.
• Attributes: Define the telemetry data fields your device reports.
• Commands: Define standard text-based commands to send to the device.
• Bytes Commands: Define binary commands with byte-level control for LoRaWAN downlinks.
Bytes Commands allow you to construct precise binary payloads for LoRaWAN devices:
• Command Name: Human-readable name for the command.
• Command: The command identifier.
• Convert to HEX: Select Yes to auto-convert parameter values to hexadecimal format.
• Byte Definition: Add parameters with Data Type and Range to construct the binary payload structure.
Click Add Definition to add multiple byte parameters. Save the template when complete.
Navigate to Wireless Device → Devices tab and click Create Device. Select LoRaWAN as the Transmission Type. The device creation has four tabs:
Tab 1 — Properties:
• Device Name: A human-readable display name.
• Network Type: Select Private or Public.
• If Public: Network Coverage dropdown becomes mandatory — select the coverage area where your device will operate.
• If Private: LoRaWAN Gateway dropdown appears — select the gateway you created in Step 1.
• Entity: Select the organizational entity.
• Template: Select your LoRaWAN template.
• Device Decoder: Select the decoder (e.g., Raw Data Default) — dynamically available based on template.
• Custom Decoder: Optional custom decoder from Key Vault.
Tab 2 — Device Specification:
• Device Specification: Select the activation method — OTAA v1.0.x or ABP.
• DevEUI: The unique device identifier (from your hardware).
• AppKey: Application key for OTAA authentication.
• App EUI / Join EUI: Application identifier for the join server.
Important: Only OTAA devices can connect to public networks with roaming. ABP devices are limited to private networks only.
Tab 3 — Device Profile:
• Device Profile: Select or create a new device profile.
• Frequency Band (RFRegion): Select the radio frequency region.
• MAC Version: Select the LoRaWAN MAC version.
• Regional Parameters Version: Select the regional parameters specification.
• MAX EIRP: Maximum Effective Isotropic Radiated Power.
• Supports Class B: Toggle and configure ClassBTimeout, PingSlotFreq, PingSlotPeriod, PingSlotDR.
• Supports Class C: Toggle and configure ClassCTimeout.
Tab 4 — Other Specifications:
• Optional Settings: Toggle to configure advanced parameters.
• RXDelay1, RXDataRate2, RXDROffset1, RXFreq2, FactoryPresetFreqs, MaxDutyCycle.
• Supports 32bit FCnt: Toggle for extended frame counter support.
Click Save to register the device. It will begin listening for join requests (OTAA) or be immediately active (ABP).
Understanding the difference between public and private LoRaWAN networks:
Public Network: Uses shared infrastructure (e.g., Everynet). Requires network coverage in your area. Only OTAA activation supported. Devices can roam across gateways. Check coverage map before onboarding.
Private Network: Uses your own LoRaWAN gateway registered in /IOTCONNECT™. Supports both OTAA and ABP activation. Full control over network infrastructure. No external coverage dependency.
Roaming (Public only): Only devices using OTAA (Over-the-Air Authentication) as activation method can enable roaming and connect to the public network. ABP devices are not supported for public network connectivity.
Proximity Requirement (Public): To connect devices via the public network, they must be in close proximity to a supported coverage area.
Coverage Check: To verify coverage for the Everynet public network, use the coverage map link provided in the device creation portal to locate your area.
LoRaWAN devices often require binary-encoded downlink commands. The Bytes Commands feature in /IOTCONNECT™ templates allows you to define structured binary payloads without manual hex encoding.
How to configure Bytes Commands in a template
1. Open your LoRaWAN template and navigate to the Bytes Commands tab.
2. Enter a Command Name (human-readable identifier).
3. Enter the Command code.
4. Set Convert to HEX to Yes if parameter values should be auto-converted to hexadecimal.
5. Under Byte Definition, add parameters:
• Parameter: Name of the byte field.
• Data Type: Select the data type (uint8, uint16, int8, int16, float, etc.).
• Range: Define valid value range for the parameter.
6. Click Add Definition to add more parameters to the payload structure.
7. Save the template.
When executing a Bytes Command from the Commands tab, you enter the parameter values and the platform automatically constructs the correctly formatted binary downlink payload for the LoRaWAN device.
After creating the device and powering on your LoRaWAN hardware within gateway range:
• OTAA devices: The device will send a Join Request. Once accepted, it appears as CONNECTED in the portal.
• ABP devices: The device is immediately active and will show data on first uplink.
Monitor the device in Wireless Device → Devices:
• Last Connection: When the device last communicated.
• Provisioning Status: CONNECTED (green) when joined and active.
• Status: Active indicates the device is operational.
Send downlink commands to your LoRaWAN device from the Commands tab. Both standard text commands and Bytes Commands defined in your template are available.
Downlinks are queued and delivered on the next Class A receive window, at the next Class B beacon slot, or immediately for Class C devices. The platform tracks delivery status and acknowledgment.
Text Commands: Send plain text or JSON payloads to the device.
Bytes Commands: Send structured binary payloads built from the template byte definitions with auto HEX conversion.
Firmware OTA: Push firmware updates via the Firmware tab using FUOTA (Firmware Update Over The Air) for supported devices.