


Onboarding steps at a glance
Follow these five steps to onboard your smart device to /IOTCONNECT™
:
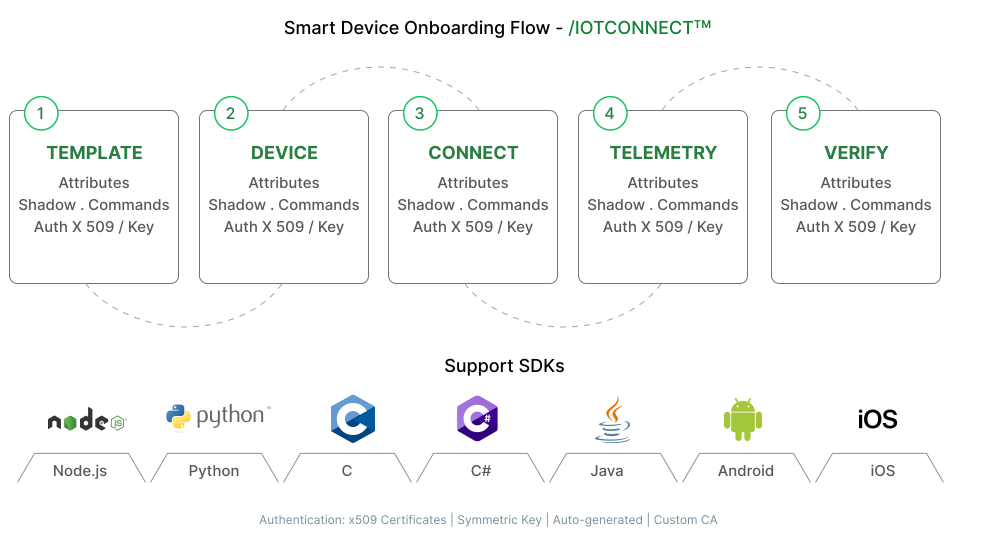
This guide provides step-by-step instructions for onboarding a new IoT Device to the /IOTCONNECT™ platform. You will learn how to create a Device Template, define attributes (sensors), register a device, and verify connectivity.
Follow these five steps to onboard your smart device to /IOTCONNECT™
:
Before you begin, ensure you have the following ready:
Active /IOTCONNECT™ account: You must be registered and have login credentials.
Company ID (CPID): Available under your company profile after login. Required for SDK connections.
Entity created: At least one entity (organizational unit) must exist. Entities represent locations, departments, or logical groupings.
Device (optional): A physical IoT device, or use the built-in simulator for testing.
Watch the complete walkthrough video showing the end-to-end process of onboarding and validating a Smart Device, including connectivity, telemetry, commands, OTA updates, rules, notifications, and device management with the IoTConnect platform.
Complete the following fields in the template creation form:
| Field | Required | Description | Rules / Limits |
|---|---|---|---|
| Template Code | Required | A unique short code to identify the template programmatically. | Max 10 characters. Must be alphanumeric and start with a letter. Example: THERM01 |
| Template Name | Required | A descriptive name for this template (e.g., “Smart Thermostat”, “Environmental Sensor”). | Max 100 characters |
| Authentication Type | Required | Pre-set to x509. Certificate-based authentication for secure device identity. | Read-only. Always x509. |
| Device Message Version | Required | The message protocol version used for Device communication. | Default: 2.1 |
| C2D (Command & OTAs) Delivery | Required | Determines how cloud-to-Device commands and OTA updates are delivered. | Default: Normal |
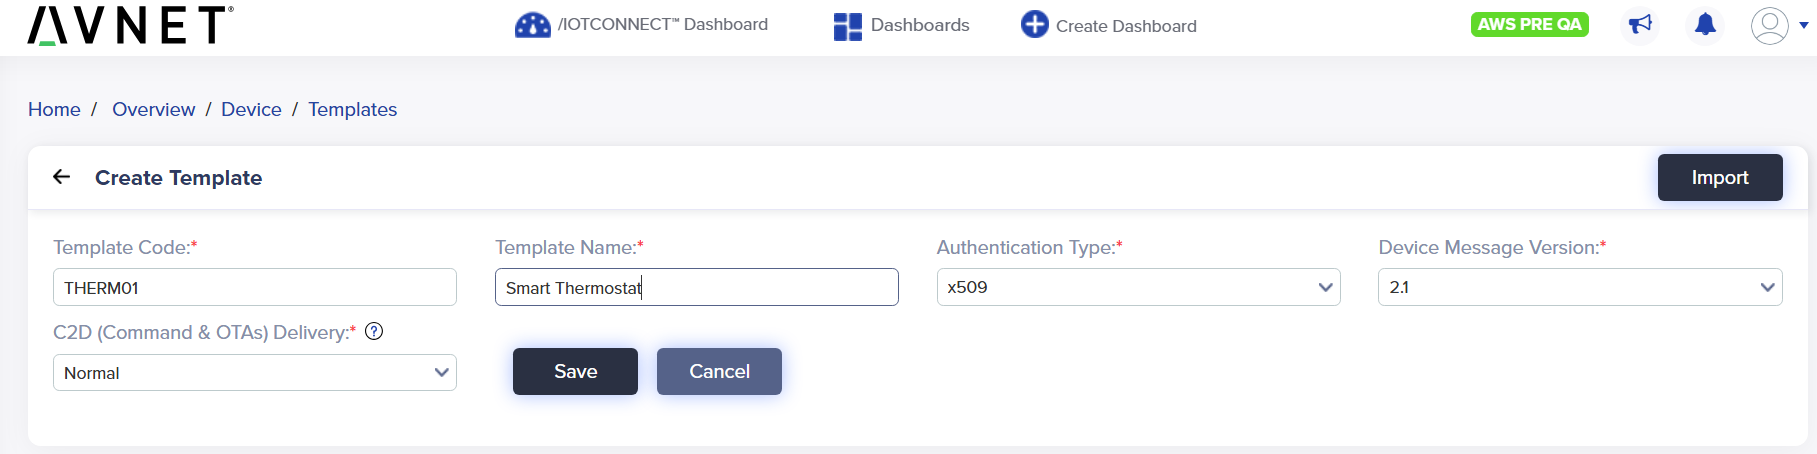
The authentication type for templates in /IOTCONNECT™ is X.509. This is pre-selected and cannot be changed. X.509 certificate-based authentication ensures secure, industry-standard Device identity verification.
The security configuration (how the Device certificate is provisioned) is determined at the Device creation step, not at the template level.
ℹ️ Note
The Authentication Type field on the template form will show x509. You do not need to select a different type. Certificate handling options (auto-generated or custom) are configured when you create individual Devices.
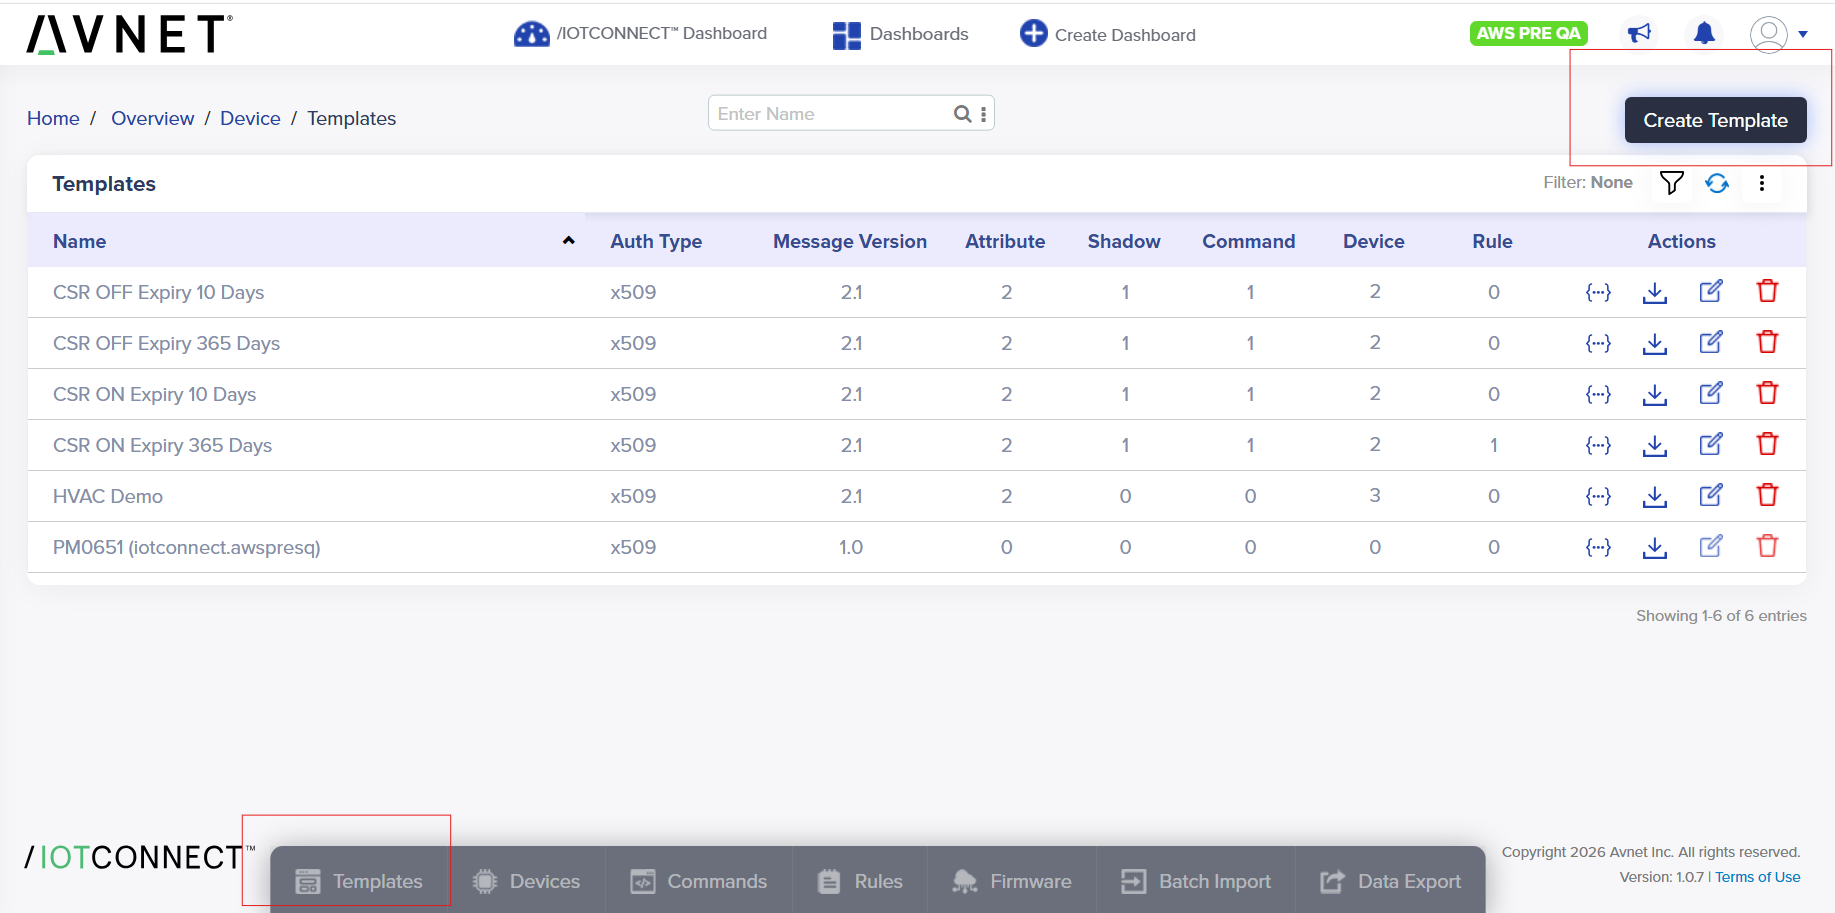
You can also access Devices, Rules, Firmware, Batch Import, and Data Export from the bottom navigation tabs.
The Properties tab displays the following configurable settings:
| Field | Description | Default |
|---|---|---|
| Template Code | Your unique template code (read-only after creation). | As entered (e.g., THERM01) |
| Template Name | Display name of the template. | As entered |
| Authentication Type | Always x509 (read-only). | x509 |
| Device Message Version | Message protocol version. | 2.1 |
| C2D (Command & OTAs) Delivery | How commands and OTA updates are delivered to Devices. | Normal |
| Description | Optional description for the template. | — |
| Hardware Version | Associated firmware hardware version. | NA |
| Data Frequency (In Seconds) | Expected telemetry reporting interval. | 5 |
| Enable File Support | Toggle to allow Device file uploads. | Off |
| Enable Certificate Rotation | Toggle to auto-rotate Device certificates before expiry. | On |
| Rotation Renewal (In Days) | Number of days before expiry to trigger certificate renewal. | 0 |
| CSR Enabled Device | Toggle to enable Certificate Signing Request flow for Devices. | Off |
| Enable Streaming | Toggle for video / data streaming support. | On (if applicable) |
| Stream Resource / Stream Type | Video stream configuration (Video Stream, IP Based, etc.). | Video Stream / IP Based |
| Auto Start Video Stream | Automatically start streaming when Device connects. | Off |
✅ Result
Your Template is now created and visible in the Templates list. The Template detail page shows all configuration tabs. Next, switch to the Attributes tab to define what data Devices using this Template will report.
The Attributes tab shows a form on the left to add new attributes and a “My Attributes” panel on the right listing all existing attributes (e.g., temperature, humidity).
Fill in the attribute form for each sensor / data point your Device reports:
| Field | Required | Description |
|---|---|---|
| Local Name | Required | The programmatic name of the attribute. This is the key that your Device uses when sending telemetry. Must be alphanumeric + underscore, start with a letter. Example: temperature, humidity |
| Display Name | Optional | Human-readable label shown in the UI. If not provided, Local Name is used as display. |
| Data Type | Required | Select from the dropdown. See Supported Data Types below. |
| Color Code | Optional | Visual color used in charts and dashboards. Click the color picker to select. |
| Unit | Optional | Measurement unit displayed alongside the value. Example: °C, %, hPa, m/s |
After filling in the fields, the attribute appears in the “My Attributes” panel on the right. You can reorder attributes using the drag handle or delete them using the trash icon.
Select the appropriate data type from the dropdown that matches the value your sensor reports:
| Data Type | Description | Example Values |
|---|---|---|
| INTEGER | Whole numbers without decimals. | 25, 100, -10 |
| LONG | Large whole numbers (64-bit integers). | 1234567890 |
| DECIMAL | Numbers with decimal precision. | 25.5, 99.99 |
| STRING | Text / string values. | "active", "ON" |
| BIT (0 | 1) | Binary value — 0 or 1 only. | 0, 1 |
| BOOLEAN (True | False | true | false) | Boolean value. | true, false |
| DATE | Date value (without time). | "2026-06-12" |
| DATETIME | Date and time combined. | "2026-06-12T10:30:00Z" |
| LATLONG | Latitude and longitude coordinate pair. | "23.0225,72.5714" |
| OBJECT | Nested structure containing child attributes. | {"lat": 23.5, "lng": 72.6} |
| ARRAY | Array / list of values. | [1, 2, 3] |
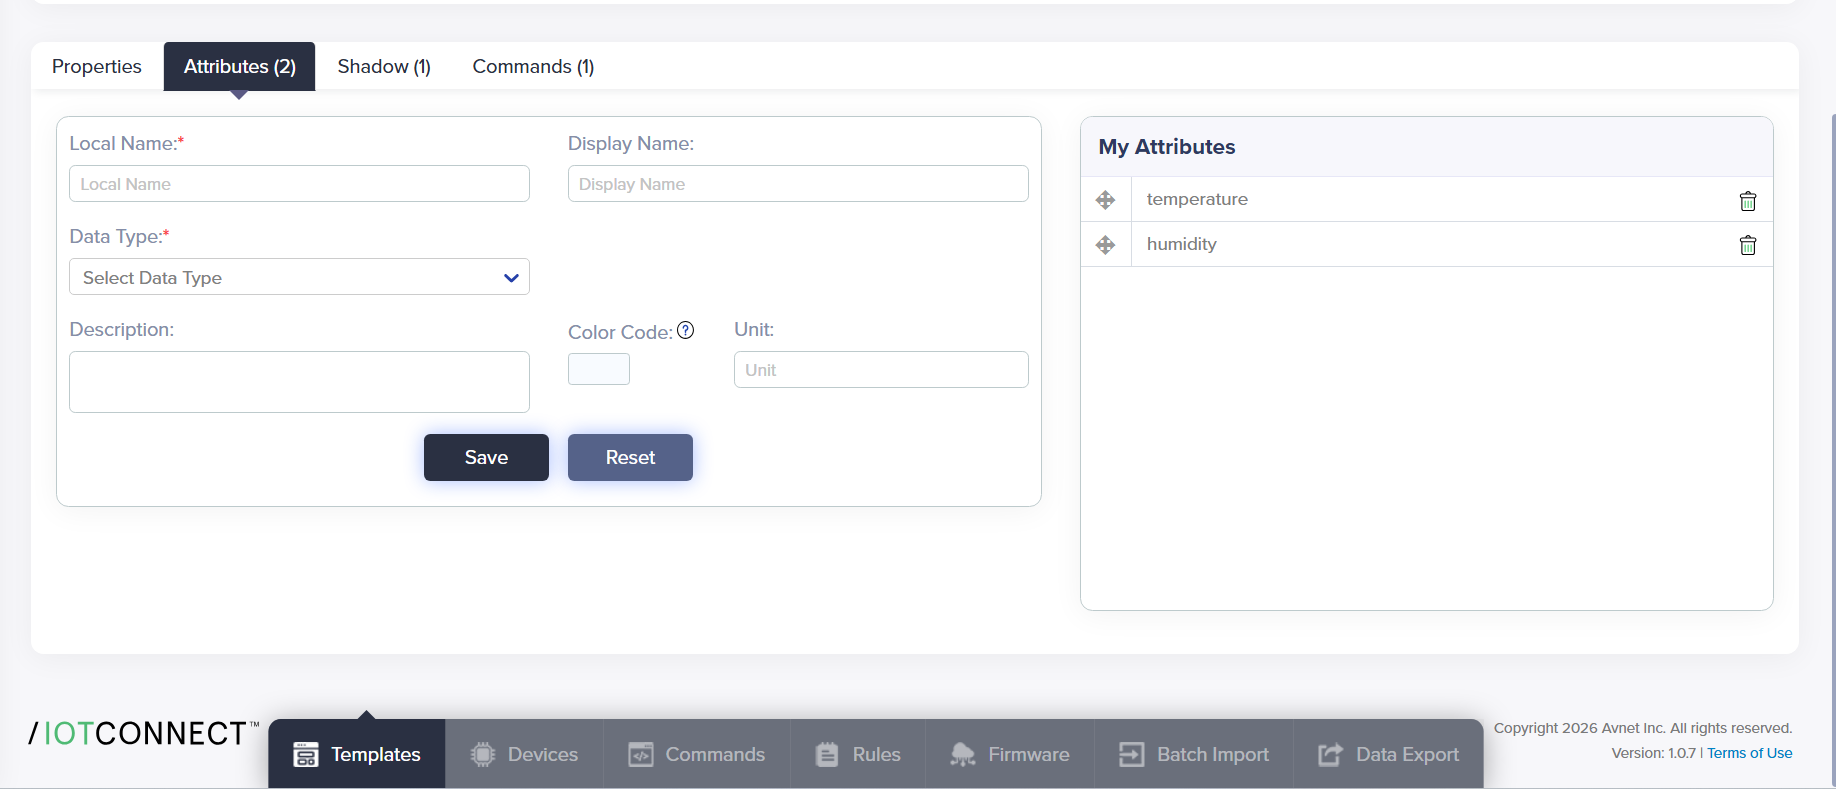
Screenshot: Attribute creation form showing fields and data type dropdown
Repeat Step 2 for each sensor or data point. Common examples:
temperature — number — °Chumidity — number — %battery_level — number — %status — stringlocation — object (with lat/lng children)✅ Result
Your template now has defined attributes. Devices using this template will be expected to send data matching these attribute definitions.
The Shadow tab allows you to define desired properties that the platform pushes to Devices. These represent the expected state or configuration values for your Device (e.g., target temperature, refresh interval).
Switch to the Shadow tab on the template detail page to add shadow properties.
| Field | Required | Description |
|---|---|---|
| Property | Required | The name of the shadow property. This is the identifier used in the Device twin. |
| Key | Required | The key used to reference this property in Device communication. |
| Data Type | Required | Select from: BIT (0|1), BOOLEAN (True|False|true|false), DATE, DATETIME, DECIMAL, INTEGER, LONG, STRING, TIME. |
| Default Value | Required | The initial / default value assigned to this shadow property when a Device is created. |
After saving, the shadow property appears in the “My Shadow” panel on the right showing Property, Key, Data Type, Default Value, and Action columns. You can lock or delete entries.
ℹ️ Example
Property: TShadow01, Key: TShadow01, Data Type: INTEGER, Default Value: 15
This sets an initial configuration value of 15 that the Device can read and the cloud can update.
The Commands tab allows you to define cloud-to-Device (C2D) commands. These are actions you can trigger from the platform to execute on the Device remotely (e.g., reboot, turn on / off, set configuration).
Switch to the Commands tab on the template detail page to add commands.
| Field | Required | Description |
|---|---|---|
| Command Name | Required | A descriptive name for the command (e.g., “Reboot Device”, “Set Temperature”). |
| Command | Required | The actual command string sent to the Device (e.g., RR_ON, REBOOT). |
| Parameter Required | Optional | Toggle ON if the command requires a parameter value when executed (e.g., a target temperature value). |
| Receipt Required | Optional | Toggle ON if the Device must acknowledge receipt of the command back to the platform. |
| Is OTA Command | Optional | Toggle ON if this command is an Over-The-Air update command. |
After saving, the command appears in the “My Commands” panel on the right. You can delete commands using the trash icon.
ℹ️ Example
Command Name: “Relay ON”, Command: RR_ON, Parameter Required: Off, Receipt Required: Off, Is OTA Command: Off.
This sends a simple RR_ON command to the Device to turn on a relay.
Complete the Device registration form:
| Field | Required | Description | Rules / Limits |
|---|---|---|---|
| Unique Id | Required | The unique identifier for this Device. Used by the Device SDK to connect to the platform. | Max 31 characters (for x509 templates). Must be unique across your account. |
| Device Name | Required | A human-readable display name for this Device shown in the portal. | Max 100 characters. Example: “Office Thermostat – Floor 2” |
| Entity | Required | The organizational entity this Device belongs to (e.g., “Building A”, “Factory Floor”). | Select from dropdown of existing entities |
| Template | Required | The Device Template to associate. This determines what attributes the Device reports and its authentication type. | Select from dropdown of available templates |
| Device Certificate | Required | Choose how the Device certificate is provisioned. See Device Certificate Options below. | Two options: Auto-generated (recommended) or Use my certificate |
| Notes | Optional | Additional notes or description about the Device. | Max 500 characters |
Since the template authentication type is x509, every Device requires a certificate for secure communication. You have two options when creating a Device:
The platform automatically generates a self-signed certificate for the Device. This is the simplest option and recommended for most use cases.
Upload your own certificate for scenarios where you manage your own PKI infrastructure or need CA-signed individual certificates.
When you select Use my Certificate, the following additional fields appear:
| Field | Required | Description |
|---|---|---|
| Certificate Authority | Optional | Select a pre-registered Certificate Authority from the dropdown. Use this when your Device certificate is signed by a CA registered with the platform. |
| Device Certificate | Required | Upload the Device certificate file (.pfx format). Click Browse to select the file. |
| Certificate Text | Alternative | Instead of uploading a file, paste the certificate content as text (PEM format). Use this OR the file upload — not both. |
| Notes | Optional | Additional notes about the Device or certificate. |
⚠️ Important
When using “Use my certificate”, you must provide either a Device Certificate file (.pfx) OR the Certificate text (PEM format) — not both. If you select a Certificate Authority, the Device certificate must be signed by that CA.
⚠️ Important
For x509 templates, the Unique ID must be ≤ 31 characters for both parent and child Devices. The Device Unique ID is used as part of the certificate registration identifier.
After filling in all fields:
The Device will be created with status “Created”. Once the Device connects for the first time, status changes to “Active”.
ℹ️ Device Status Lifecycle
Created → Device is registered but has not connected yet.
Active → Device has connected and is operational.
Inactive → Device has been manually deactivated.
Acquired → Device has been claimed by another entity.
Released → Device has been released from an entity.
✅ Result
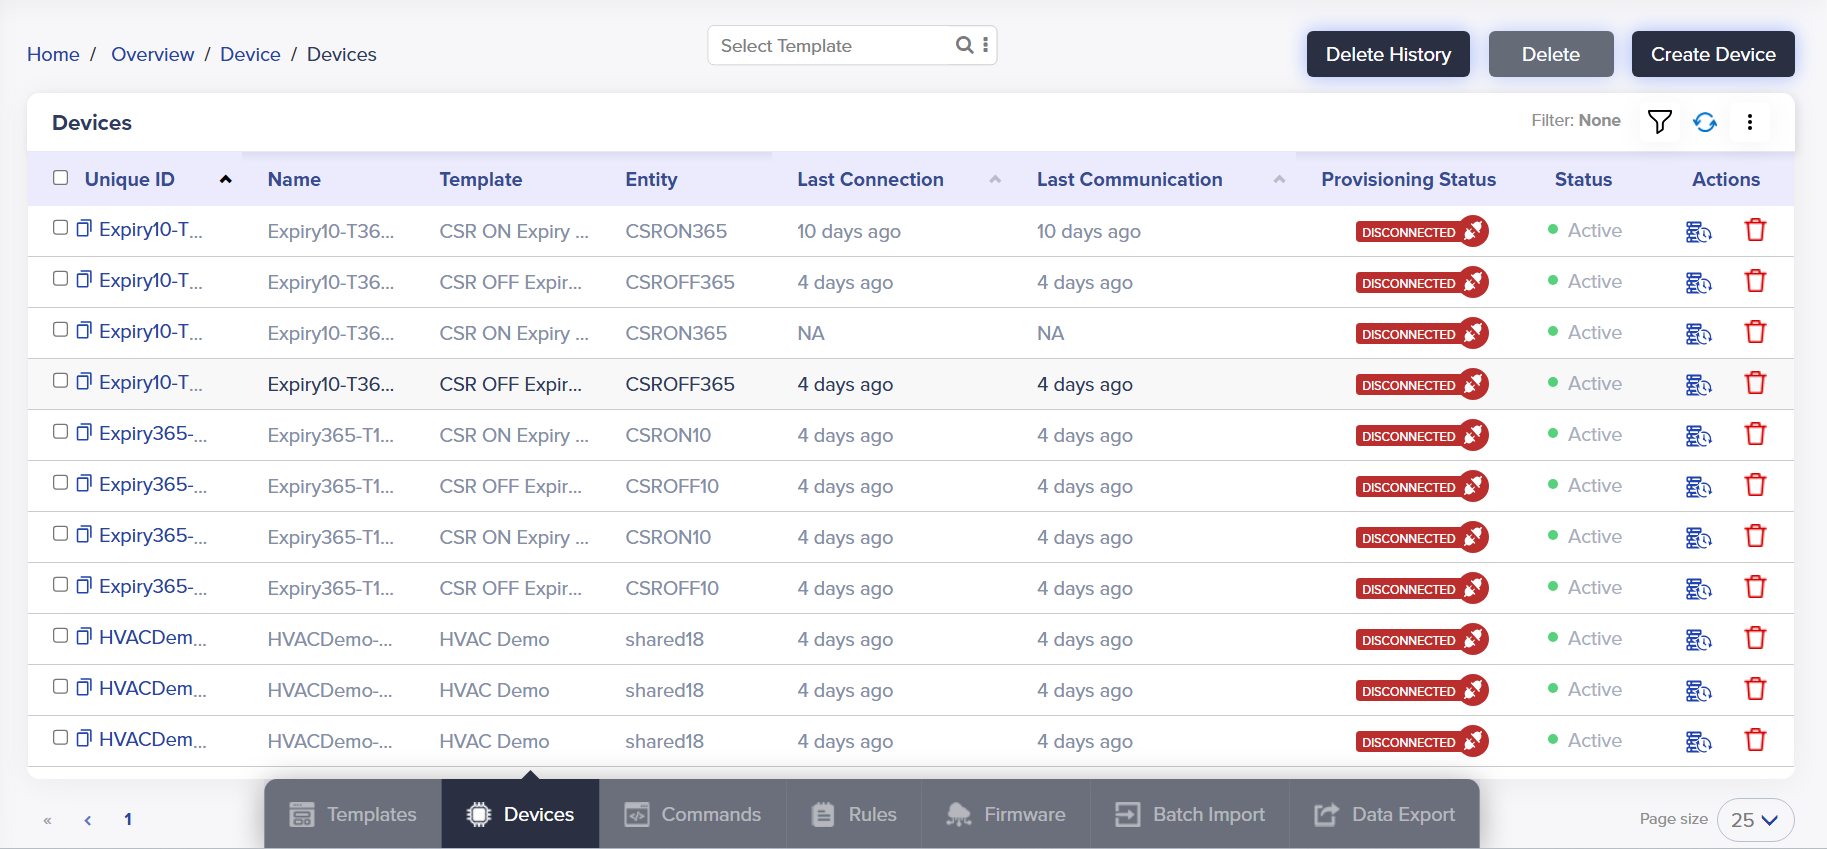
Your Device is now registered on the platform. It will appear in the Device list with its unique ID, display name, template association, and connection status.
With the device registered, you can now establish connectivity and begin sending telemetry data. You have two options: use the built-in simulator for testing or integrate with the SDK for a real device.
The built-in simulator lets you validate your template configuration and data flow without a physical device.
| Parameter | Description | Example |
|---|---|---|
| Interval | Time in seconds between each data transmission. | 6 (sends data every 6 seconds) |
| Duration | Total simulation time in minutes. | 10 (runs for 10 minutes) |
| Min Value | Minimum value for the simulated attribute data. | 18 (minimum temperature) |
| Max Value | Maximum value for the simulated attribute data. | 35 (maximum temperature) |
| Precision | Decimal precision for generated values. | 2 (e.g., 25.73) |
For production device, use the /IOTCONNECT™ SDK to establish a secure connection and send telemetry programmatically.
| SDK | Description |
|---|---|
| Node.js | JavaScript / TypeScript SDK for server-side and embedded Linux devices. |
| Python | Python SDK for Raspberry Pi, Linux gateways, and prototyping. |
| C | Lightweight C SDK for microcontrollers and constrained devices. |
| C# / .NET | .NET SDK for Windows IoT and Azure Sphere devices. |
| Java | Java SDK for Android Things and JVM-based gateways. |
| Android / iOS | Mobile SDKs for companion apps and mobile-connected devices. |
Once your device is connected (via simulator or SDK), verify that data is flowing correctly through the platform.
Navigation Device > Device > [Your Device] > Live Data
| View | Description |
|---|---|
| Telemetry | Shows the latest attribute values received from the device in real time. Values update as new data arrives. |
| Graph | Visual time-series chart showing attribute value changes over time. Useful for spotting trends and anomalies. |
| Tabular | A structured table with timestamps and attribute values. Best for detailed inspection and data export. |
✅ Congratulations!
Your device is now fully onboarded to /IOTCONNECT™. You can see real-time telemetry data flowing from your device to the platform. From here, you can set up rules, alerts, dashboards, and integrations.
1. Create a Template with Attributes and Commands.
2. Create a Device with auto-generated Certificate.
3. Use the Simulator to test data flow immediately.
4. Integrate with SDK for production.
5. View telemetry in the Live data tab.
SDK Repositories:
– Python SDK
– C SDK
– Node.js SDK
SETTINGS > KEY VAULT
for CPID and environment values.